It's been almost an entire year since James and I moved into our house. We've been updating this, painting that, repairing things, etc. The joys of home ownership. One of the things that kept bugging both him and I was the lack of curb-appeal. The contractors that remodeled our house and the neighbors seemed to run out of creativity and steam by the time they got to ours. Our front porch was no more than an unstained platform with some railings slapped on to it. They did no landscaping but they did paint the door a bright lime green for that pop of contemporary color!
The back porch is much larger and painted/stained so I made the trip to Lowes and had them match the stain. Our first thought was to see what adding paint would do and how much it would help. It did, a little, but it wasn't enough.
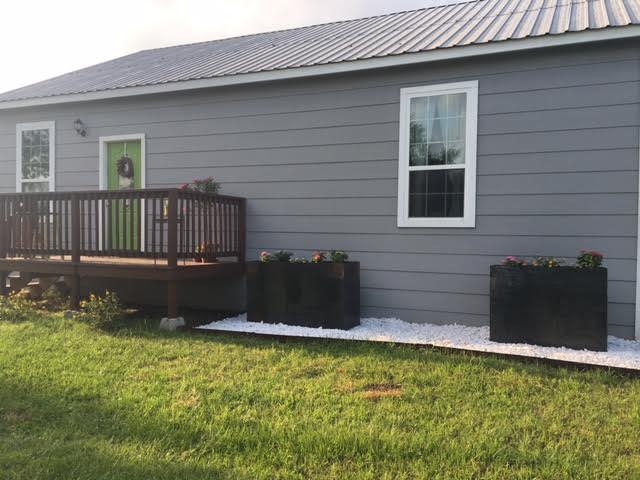
Luckily I have a handy-man husband who decided to take on the project of adding on to the porch. I came home one weekend and viola! The porch was larger! Of course, I had to paint it because that is one thing that my husband refuses to do! Once we added on to the deck we decided to get started on some landscaping. I don't have the greenest thumb and one thing I hate doing is getting on my hands and knees and weeding out flower beds. I did that as a child and I knew I didn't want to as an adult. Since James makes beautiful planter boxes, we decided to add some to our home. We covered the surrounding area with white rocks first and then inserted James' planter boxes.


Next came the fun part- for me at least- choosing the flowers. I did some research and talked to co-workers and friends about which plants would be easiest and best for the Texas heat (and for my laziness). I wanted color in the planter boxes and then some flowering bushes in front of the porch to eventually grow up to the height of the deck. James bought a flowering tree to place on the porch. Overall, I'm very happy with how everything came together. Now I just need to make sure I keep them all alive :)


Even with all of these updates and improvements James and I both knew we needed something more. Eventually we want to add a roof and cover the front porch but that's a larger project than we want to dive into right now. So, I thought about shutters. James agreed and my research began. I found a great video tutorial through a trusty pinterest blog and after watching it- we made the trip to Lowes for lumber and paint. We followed the directions to a T (other than the measurements since our windows were 84" versus 60"). They were super quick and easy to make and I think they fit perfectly with our home.
Even though we have more work to do, we are happy with the transformation and what we have right now!!!
There are so many different ways to use paint chips as a teacher but one of my favorites is the one above. I've found that having them make flash cards this way is more fun and engaging and they tend to be a little more excited about creating them. The best part about this wonderful creation is that it is completely free!! Just go to your local hardware store, Lowes, Home Depot, etc. and grab some paint chips. I'm not exactly sure which brand has the square holes already in them but those are the best for this project since you can put the ring right through it and save time versus hole punching each one.
I decided to save time and use a stapler to attach each chip back-to-back so that the definition and word would be on color versus the white backing of the chips. I'm sure you could use double sided tape or glue to make it look more flush and clean but for the sake of time- I just stapled them.
I had the plastic rings lying around from a few years ago- I think they were $3-$4 at a teacher store but you could use metal rings, a twist tie, etc. to attach them together. Since I teach math this is a great way for students to practice their math vocabulary words for each unit. You could even have them put math facts on them.
As I was organizing the upstairs a few weeks ago I came across a Rubbermaid container of childhood games that my parents handed down to me before my move to Texas. I dusted off the top and opened it up to find so many of my childhood favorites. They were mainly the classics; Monopoly, Scrabble, Battleship, Uno, Yatzee, Boggle, etc. Growing up we didn't have any electronic gaming systems so my sisters and I played a TON of board games. We had an entire closet in our basement just for the storage of all of our board games- serious business. While I was finding places on shelves to store the games I thought about how much fun we had as kids playing these games and how educational most of them actually are. We never knew we were "doing math" while playing Yatzee or "learning how to spell" during an intense game of Scrabble.
So, as I looked down at Boggle I thought about how I could adapt it for my students. Of course, if I taught reading or writing it would be perfect just the way it is. So, I decided to swap out the letter dice for regular old number dice. Then, I sat there and stared at it for a while to decide how I actually wanted to use it, effectively. I work with 4th and 5th grade special education students who struggle with their facts and fluency and number sense in general. I decided to start with, "making 10" and the kids LOVE IT. I set a timer for 2 or 3 minutes, they grab a white board and expo, shake it up and go! The rules are simple: find numbers that are next to each other (cannot be diagonal) that when added up give you the sum of 10. Some highlighted examples are shown below:

Once the timer goes off they share with each other the combinations they found and where they were on the board. Similar to Scattegories, if they both had the same equation, neither gets the point and if they found a combination that is unique, they score a point.
My kids are having a blast finding combinations of 10 while working on our social skills of being a good winner/loser. Another reason I love this is because I can use it in a small group setting- it doesn't require a whole class to play.
The versatility is endless. New ideas that the students and I have thought of are; Multiplication combinations that are divisible by: 2 or 3 or 5, etc. Sums of 5, Differences of 5, as many math facts you can find until the timer goes off. Do you have some other ideas of ways to use this? I'd love to hear them in the comment section below!
For all of us teachers, it's that time of year again- state testing (cue the violins). My fifth graders finished their math and reading tests this week and my fourth graders took their writing exam. I wanted to give them a little "good luck note/treat" before their tests and I loved the idea of the mints, since they are allowed to have them during testing. It was super easy to make (a bag of life saver mints and colored card stock) and my kids loved them!
I had a few Etsy orders that needed to get done over Spring Break last week and I was in the groove so I decided to make a few new signs. You know that feeling when you're so motivated you don't want to stop and lose all that momentum? Well, that's where I was at so I knew it was now or never.
My old co-worker turned real-estate agent had given James and I this metal ampersand she made for our wedding (almost 4 years back) and I had been wanting to incorporate it into a pallet sign for months. I love the way that metal and wood look together and knew the rustic-ness of the ampersand would go perfectly with a blank sign I had previously made.
Now came the hard part- choosing the perfect quote. Obviously it had to have the word "and" in it and it was going up on my wall in the kitchen so I wanted it to be more about food, drinks, etc. rather than love and life and all those ooey-gooey kind of quotes. I had been searching for weeks when I came across two final contestants: "Life is what happens between coffee and wine" and "The best part of my day is coffee and you." Since my husband and I are both avid coffee drinkers (to the point where if there was rehab- we may need to attend) these two quotes were perfect. I sat on it for another couple of days- I told you it was a long process- and finally chose my quote.

I chose various sizes and fonts, stenciled it on, painted it white (thought about other colors but went back to trusty old white since it never disappoints) and merely hot glued the ampersand on. I couldn't be happier with the outcome. I'm so glad I waited and took the time to find all of the right elements to make this beautiful new piece for our home!
With Spring around the corner and all the department store stocking their shelves with eggs, what better time to do some hands on math? These little plastic gems have been a life saver for me this week as it's the week before our Spring Break vacation. If you are a teacher- you know what I'm talking about. I am a special education teacher for fourth and fifth graders and I work with a fourth grade who has Downs Syndrome. So, when I was thinking of ways to incorporate these eggs into my pull out groups, I had to think of activities ranging from first grade level up to fifth. I looked through the Texas standards and came up with these ideas... enjoy!


I had this awesome container that I purchased last year from the Dollar Tree that is working out great to hold the eggs and keep them separated. I may need to go back and purchase another one since the students are enjoying them so much! When I want the kids to try to match them I take them apart and put them in another little plastic container so they aren't rolling all over the table.
I wanted my fifth graders to practice ordering fractions with unlike denominators so I created some random fraction eggs and had the kids place them in order using an old egg container. It works perfectly for the number line concept and makes it easy to re-arrange them.
I hope that these ideas have inspired you to purchase some eggs and give your students the chance to have some fun while learning! *Side note: I bought two different style eggs. The smaller bags of 12 were $0.89 from Target and the larger bag of 48 was $2.98 from Wal-Mart. The downside of the cheaper ones from Wal-Mart is that they are very flimsy and harder to actually "snap" together. The Target ones are much more durable. Oh, and all I used to write on them was a colored Sharpie marker. It's so easy you just have to try it out!


