After picking through a box of "junk" at our friends antique shop and finding a bunch of old horse shoes, I knew what I wanted to make with them. I grew up with horses and I love to drink wine so I figured- why not mix the two! Surely there are more people like me that love wine and horses! And viola- this beautiful wine rack was created.
I had James grind down the horse shoes to make them look a little more shiny than they originally were. Some were pretty old and rusty and although I love things rustic, they were a little too rustic for my liking.
We used a piece of pallet wood for the back and added a little stain to give it a good "pop"! The first rack we made I used a light pine stain and when we made a second rack, I decided to use a dark walnut stain. I love the way both of them turned out. It's really more about preference.
Both racks sold pretty quickly- one at Jessie's store and the other on Etsy. We are always looking for more old horse shoes so we can continue making these beautiful pieces.
Saturday, January 30, 2016
Monday, January 25, 2016
Planter Box Perfection
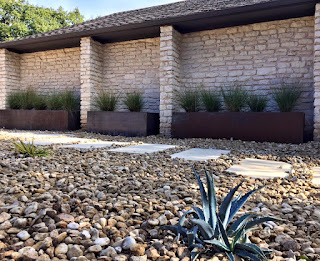
My talented husband is at it again! He created these
beautiful planter boxes for our dear friend and real estate agent. She had just
recently moved and during the process of remodeling, she decided she wanted
some planter boxes as a statement piece outside of her house.
That’s when James came to the rescue! He brought his welder and
supplies over to her house and welded the boxes together on site. She just
recently finished all of the surrounding landscaping and sent us these photos.
I couldn’t help but share!
Excuse the “not-so-focused” snapshot from the listing agent
on a house for sale in Austin that James made custom planter boxes for
as well.
Wednesday, January 20, 2016
I'm having a sale!!
Come check out my Teachers Pay Teachers store. It's mainly geared toward fourth and fifth grade math products- and best of all- everything is on sale today (1/20) and tomorrow (1/21)!
Saturday, January 9, 2016
Rustic Texas Pallet Sign
As you know, I love to create signs and decor with pallets and this may be one of my favorites so far! I loved it so much I couldn't bear to part with it and put it in my Etsy shop, so I placed it above my television instead. I've learned that is one of the hardest things about making all of these unique signs and decor- parting with them.
This sign is about 42" long and around 24" tall. It's one of the larger (and heavier) pieces I've made so finding studs along with centering it in the wall proved to be quite the challenge. Luckily I have a wonderful- and strong- husband and a trusty stud-finder that helped.
I had to use two coats of paint on this in order to get the look I wanted. It required one full tube of white acrylic paint and about two hours of painting. I'd say it was time and money ($.99) well spent.
The greatest thing about this sign is how cheap it is to make:
- The pallets were free- just go to your local hardware store and ask them where they place the pallets they don't want. Some stores leave them in the parking lot, others mark them with certain colors, just ask!
- The paint is less than a dollar if you use a coupon at Hobby Lobby or even full price it's no more than $2.
- My husband and I have a nail gun but a trusty old hammer and nails would work (with a little more effort) to attach the boards together from the back. Although, before we invested in an air compressor and nail gun we used screws and a drill.
Subscribe to:
Comments (Atom)


